Monday, July 31, 2023

Exchange hybrid "writeback" with Cloud Sync (Cloud to On-prem Sync)

Standard


An Exchange hybrid deployment is a way to extend the feature-rich experience and administrative control of an on-premises Microsoft Exchange organization to the cloud. It provides a seamless look and feel of a single Exchange organization between an on-premises Exchange organization and Exchange Online.

With this new feature enabled, we can "write back" Exchange Online attribute to on-premises AD environment.

How to setup Azure AD Connect cloud sync to your Organization

Standard


Introducing Azure AD Connect Cloud Sync, a cutting-edge solution by Microsoft designed to cater to your hybrid identity needs for seamless synchronization of users, groups, and contacts to Azure AD. This innovative offering utilizes the Azure AD cloud provisioning agent, presenting a departure from the traditional Azure AD Connect application. 

Monday, July 17, 2023

All you need to know about Remote Help with MS Intune

Standard


Prerequisites

Network Requirement

Remote Help communicates over port 443 (https) and connects to the Remote Assistance Service at https://remoteassistance.support.services.microsoft.com by using the Remote Desktop Protocol (RDP). The traffic is encrypted with TLS 1.2.

Both the helper and sharer must be able to reach these endpoints over port 443:
Domain/NameDescription
*.aria.microsoft.comUsed for accessibility features within the app
*.events.data.microsoft.comMicrosoft Telemetry Service
*.monitor.azure.comRequired for telemetry and remote service initialization
*.support.services.microsoft.comPrimary endpoint used for the Remote Help application
*.trouter.skype.comUsed for Azure Communication Service for chat and connection between parties
*.aadcdn.msauth.netRequired for logging in to the application Microsoft Azure Active Directory (Azure AD)
*.aadcdn.msftauth.netRequired for logging in to the application Azure AD
*.edge.skype.comUsed for Azure Communication Service for chat and connection between parties
*.graph.microsoft.comUsed for connecting to the Microsoft Graph service
*.login.microsoftonline.comRequired for Microsoft sign in service. Might not be available in preview in all markets or for all localizations
*.remoteassistanceprodacs.communication.azure.comUsed for Azure Communication Service for chat and connection between parties
Allowlist for Microsoft Edge endpointsThe app uses Microsoft Edge WebView2 browser control. This article identifies the domain URLs that you need to add to the allowlist to ensure communications through firewalls and other security mechanisms

Check for Licensing

From the Intune portal you can check the licensing.
  1. Access the Intune portal.
  2. Navigate to the Endpoint portal.
  3. Proceed to the Tenant Administration section.
  4. Select "Intune Add-ons" to check the licensing.


from here you can activate your trail. 


Integrate Intune - Remote Help

  1. Access the Endpoint portal.
  2. Navigate to the Tenant Administration section.
  3. Choose "Remote Help" from the available options.
  4. Click on "Settings" and select "Configure.
Following Setting need to set

Enable Remote Help: Enable
Allowed Remote help to unenrolled Devices : Allowed 
Disable Chat : No


RBAC Permissions for Intune Remote Help

  1. Access the Endpoint portal.
  2. Navigate to the Tenant Administration section.
  3. Choose "Roles" from the available options.
You can assign the "Help Desk Operator" or you can create a new Role. Select Create button to create new role. fill the below details
  • Name : Provide a Name
  • In the permission select Remote help and select necessary permission
    • Elevation - Elevation allows the helper to enter UAC credentials when prompted on the sharer’s device when remote help is enabled. Enabling elevation also allows the helper to view and control the sharer’s device when the sharer grants the helper access.
    • View Screen - View screen allows the helper to view the sharer’s device when Remote Help is enabled for all platforms we support.
    • Take Full Control - For Windows and Android devices, take full control allows the helper to view and control the sharer’s device when Remote Help is enabled.
  • Select next & Create.

After that Open the Role base profile previously created and go to assignment. Fill the following

  • Select Assign and provide a name
  • Admin Group - Add the admin group or helper group (Support team Group)
  • Scope Group - you can add all users, All device or specific halpee group.
Select Next and Create. 

Deploy Remote help app though Intune

Frist you need to download below two setup 

Open the app Microsoft-Win32-Content-Prep-Tool and open the IntuneWinAppUtil application. 

  • specify the source folder of the Remote app for windows location
  • Specify the setup file - Example -  remotehelpinstaller.exe
  • Specify the output folder to export the intunewin file
  • Catalog  Select - No
exported location you ca see that intunewin  has been created


then go to Endpoint admin portal > 
Select app > windows Apps and click Add icon. fill below information to create the app in intune

  • App Type : Windows app (Win32) and select
  • Click Select App package and brouse the intunewin file we created previously
  • file the app information as required & click next (publisher required to fill
in the Program fill below information 
  • Install command - remotehelpinstaller.exe /quiet acceptTerms=1
  • Uninstall command - remotehelpinstaller.exe /uninstall /quiet acceptTerms=1
To opt out of automatic updates, specify enableAutoUpdates=0 as part of the install command remotehelpinstaller.exe /quiet acceptTerms=1 enableAutoUpdates=0

Requirement tabs fill below
  • Operating system architecture - 32 bit & 64 bit
  • Minimum operating system - Windows 10 1607
and select next

Detection Rules tab fill below information 
  • Rules format - Manually configure detection rules and click +add
  • Rule type - select File
  • Path, specify C:\Program Files\Remote Help
  • File or folder, specify RemoteHelp.exe
  • Detection method, select String (version)
  • Operator, select Greater than or equal to
  •  Value, specify the version of Remote Help you are deploying. For example, 10.0.22467.1000
  • Leave Associated with a 32-bit app on 64-bit clients set to No
Finished the wizard (Assignment  tab Assign to deployment group.)

Setting up Conditional Access for Remote Help

Conditional Access for Remote help still in Preview. We need to enable it before we create the polices

  • Install-Module -Name AzureADPreview
  • Connect-AzureAD
  • New-AzureADServicePrincipal -AppId 1dee7b72-b80d-4e56-933d-8b6b04f9a3e2

Create policy

  1. Access the Endpoint portal.
  2. Navigate to the Endpoint security section.
  3. Select Conditional Access
  4. then select Policy and Create New policy


Initiate a remote help session

  1. Access the Endpoint portal.
  2. Navigate to the Device section.
  3. Windows devices & open the Manage PPC


Supported features and scenarios

The following table shows the features and scenarios supported by each remote assistance option. A check mark (✅) indicates that the feature or scenario is supported, and a cross mark (❌) indicates that it's not supported.


Wednesday, July 12, 2023

System-preferred multifactor authentication Method

Standard

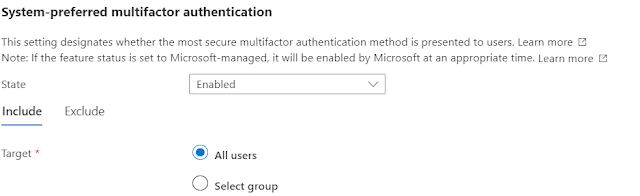
System-preferred multifactor authentication (MFA) is a security feature that prompts users to sign in using the most secure method they have registered. This can help to improve sign-in security and discourage the use of less secure methods, such as SMS.

For example, if a user has registered both SMS and Microsoft Authenticator push notifications as MFA methods, system-preferred MFA will prompt them to sign in using the push notification method. The user can still choose to sign in using another method, but they will be first prompted to try the most secure method they have registered.

If you are an administrator, I encourage you to consider enabling system-preferred MFA in your organization. This is a simple way to improve the security of your sign-in process and protect your users' data.

Enable system-preferred MFA in the Entra ID portal

By default, system-preferred MFA is Microsoft managed and disabled for all users.
  1. In the Azure portal, click Security > Authentication methods > Settings.

  2. For System-preferred multifactor authentication, choose whether to explicitly enable or disable the feature, and include or exclude any users. Excluded groups take precedence over include groups.


How does system-preferred MFA determine the most secure method?

When a user signs in, the authentication process checks which authentication methods are registered for the user. The user is then prompted to sign in with the most secure method according to the following order. The order of authentication methods is dynamic, meaning it is updated as the security landscape
changes and as better authentication methods emerge.
Temporary Access Pass

A one-time passcode that is generated and sent to the user via email or SMS.

  • FIDO2 security key

A physical security key that the user inserts into their computer or mobile device to authenticate.

  • Microsoft Authenticator push notifications

A notification that is sent to the user's Microsoft Authenticator app. The user can then approve the sign-in attempt from their app.

  • Time-based one-time password (TOTP)

A code that is generated by the user's phone or other device. The code changes every few seconds, making it difficult for attackers to guess.

  • Telephony

A phone call or text message that is sent to the user. The user then enters a code from the call or text message to authenticate.

  • Certificate-based authentication

A digital certificate that is installed on the user's computer or mobile device. The certificate is used to authenticate the user when they sign in.

Friday, July 7, 2023

Remove or Change a user's email alias in Office 365

Standard
In Office 365, changing a user's email alias has traditionally been a straightforward process that many engineers have been familiar with. However, due to recent updates by Microsoft, there have been some changes in the way we need to approach this task, causing confusion among a few of my colleagues who reached out to me for assistance. In this guide, I will outline the updated procedure for changing a user's email alias in Office 365, particularly when dealing with a Hybrid setup and synchronization between on-premises Active Directory and the cloud environment.

Change a user's email alias 

Procedure:

1. Open the Azure Active Directory portal by logging in to your Office 365 account.
2. Navigate to the "Users" section.
3. Locate and select the user whose email alias needs to be changed.
4. Open the user's profile and proceed to edit their properties.

Modifying the Email Alias:

1. In the user's properties, look for the "User Principal Name" and "Mail Nickname" attributes. These are the attributes that can now be modified from the cloud environment.
2. Update the "User Principal Name" field with the desired alias for the user's email address.
3. Similarly, modify the "Mail Nickname" field to reflect the new alias.
4. Save the changes to update the user's email alias.


Hybrid Setup Considerations:

It's worth noting that in a Hybrid setup, where synchronization occurs between on-premises Active Directory and Office 365, changing the email alias solely from the on-premises environment (proxy address) may not result in the desired changes. Therefore, it is crucial to utilize the Azure Active Directory portal to modify the necessary attributes mentioned above.

Remove a user's email alias 

In a Hybrid setup, when migrating from a domain removal scenario to an Onmicrosoft domain, there are specific steps that need to be followed to ensure a smooth transition. This guide outlines the necessary procedures, particularly when dealing with licensed and unlicensed users, and the synchronization of attribute changes from the on-premises Active Directory to Azure Active Directory.

Procedure:

Handling Licensed Users:
a. For licensed users, initiate the domain change from the on-premises Active Directory.
b. Make the necessary changes to the user's attributes, including the domain information.
c. Run an Azure AD delta sync to synchronize the exchange attributes to Azure Active Directory.
d. Note that the delta sync will only sync attribute changes to Azure if the user has an active license.

Unlicensed Users:

a. In the case of unlicensed users, a delta sync alone will not sync any attribute changes to Azure Active Directory.
b. Instead, the initial sync command must be used to ensure that the changes take effect.
c. Execute the initial sync command to synchronize the attribute changes for unlicensed users.

When migrating from a domain removal scenario to an Onmicrosoft domain in a Hybrid setup, it is crucial to follow the proper steps for both licensed and unlicensed users. For licensed users, changing the domain from the on-premises Active Directory and running an Azure AD delta sync will effectively sync the exchange attribute changes to Azure. However, for unlicensed users, the delta sync will not suffice, and the initial sync command must be utilized to ensure that the changes take effect. By adhering to these procedures, you can successfully migrate from domain removal to an Onmicrosoft domain in your Hybrid setup.

Monday, June 19, 2023

Scheduling meeting with voting poll

Standard

It is now easy to schedule a meeting when external parties are involved in the same meeting.

Last year, Microsoft released a feature called 'Find Time,' but most of us are not aware of it, and some lack knowledge about the new feature. In this article, I will share all my findings on the scheduling poll available in Outlook.

We can schedule a poll in two locations:

  • Calendar


  • New email 


Next, change the required details as per your needs.


After you create the poll, you will see it in the email or calendar request as shown below.


Check your calendar; you will see that your calendar has been tentatively booked for the selected time frame.


Once you receive the votes, you can select 'View Poll Results,' and it will open on the web (https://outlook.office.com/findtime/dashboard).


Select the meeting title to expand the results.
With the results, you can directly schedule the meeting. After successfully completing the poll, the hold time will be released."

Tuesday, June 6, 2023

Cross-Tenant Synchronization

Standard
Some customers have requested cross-tenant synchronization, but it is not currently available in its entirety. However, we do offer several features that can enable synchronization with another tenant. Some customers utilize third-party applications, while others rely on scripting for this complex integration.

To facilitate seamless synchronization between two tenants, we have a few key features that can be directly enabled and provide significant benefits:

  1. Calendar Cross-Tenant Synchronization: This feature allows for the synchronization of calendars between different tenants. It ensures that appointments, events, and important dates are shared and updated across multiple tenants.
  2. Collaboration Cross-Tenant Synchronization: With this feature, users from different tenants can collaborate effortlessly. It enables real-time collaboration enabling smooth teamwork and productivity across tenants.
  3. Application Access Cross-Tenant Synchronization: By enabling this feature, users from one tenant can seamlessly access and interact with applications and data from another tenant. It simplifies the process of sharing resources and enhances efficiency in cross-tenant workflows.

By leveraging these features, we aim to provide a robust and efficient solution for cross-tenant synchronization. Although complete synchronization is not currently available, these enabled features offer significant benefits for customers seeking to streamline their operations and enhance collaboration between tenants.

Calendar Cross-Tenant Synchronization

This is how we can enable the Calendar synchronization. 

Go to the Exchange admin Center, click Organization ad Select Sharing.

Select Organization relationship 

Manage ownerless Microsoft 365 groups and teams

Standard

To ensure smooth functioning within groups, it is essential for each group to have an owner responsible for managing membership and settings. Owners possess unique permissions, including the ability to modify group configurations. However, situations may arise when the owner leaves, leaving members in need of assistance to add a new owner. This can potentially disrupt the ecosystem, especially within Microsoft Teams.

To address this issue, one possible solution is to implement a system where an email notification is automatically sent to active group members when there is no owner present. The email would request one of the active members to step up and become the new owner. This process can be facilitated through the following steps:

  1. Log in to the O365 admin center.
  2. Navigate to the Settings section.
  3. Locate the Microsoft 365 Groups option.
  4. Enable the functionality to identify ownerless groups by ticking the corresponding checkbox.

By implementing this option, the system will proactively identify groups without owners. This will trigger an email notification to active group members, alerting them to the vacancy and asking for someone to assume the ownership role. This approach ensures continuity and prevents the ecosystem from breaking due to lack of ownership.

By following these steps, you can improve the management of groups within Microsoft Teams, promoting a seamless experience for all members and maintaining the integrity of the ecosystem.

Friday, May 19, 2023

Which Authentication is the best Authentication?

Standard

In the O365 login page, we log in with our username and password. Is this secure?

I have seen multiple incidents where our clients complain that their accounts have been hacked. Someone has sent spam emails using their accounts and they have logged in from different countries, etc. If someone steals our password, what will happen? Let's see what authentication mechanisms are available to us and the benefits of using them.

Password: Passwords can be stolen through keyloggers. To protect ourselves, we can increase the password length, add characters and symbols, and increase password history.

PIN: For PC login, we can use a PIN instead of a password. PINs are more secure than passwords because they are easy to remember and unique to one device. Even if a PIN is stolen, the potential damage is much lesser than a compromised password.

Text Message or Voice Call: This method is more secure than a PIN or password because we receive a real-time code from the authentication service that is valid for a certain time period. A few years ago, I personally told my customers that two-factor authentication using text or voice call was the secure method to safeguard our users. However, this method is not valid nowadays as text messages or voice calls can be accessed through third-party applications.

Biometric or Face ID: Compared to the previous three methods, this is the most secure way because it requires your fingerprint or face to authenticate. This method is unique to you only.

Authenticator App: The Microsoft Authenticator app is one of the most secure apps we can use for authentication. You can set up biometric or Face ID to access applications.

Which is the newest method and most recommended by security experts? 

"Go with PasswordLess"

How do we authenticate with passwordless?

You can select passwordless as your main authentication method. When you enter your username, it will automatically redirect and ask you to enter a number on your Authenticator app. To log in, you will not need a password, but you will need your mobile Authenticator app and biometric or Face ID. It will show you the location and application that is trying to authenticate.


Thursday, May 11, 2023