Thursday, May 4, 2023

Sign up for Windows Known issues Email Alerts

Standard


The Windows release health page, located within the Microsoft 365 admin center, provides access to up-to-date information regarding known issues related to both monthly and feature updates for Windows. These known issues are problems that have been identified within a Windows update and are impacting Windows devices. By accessing the Windows release health page, you can stay informed about these issues and leverage this information to help troubleshoot any problems that your users may be experiencing. Additionally, this resource can help you make informed decisions about when and how to deploy updates within your organization based on the scale and severity of the known issues.

This feature provides an advantage to IT teams when troubleshooting Windows-level issues. Previously, we had to check each endpoint to see which update was recently installed and then search for known issues related to the update. However, with this new approach, we can proactively receive information on all known issues related to the selected product in your inbox. This enables us to take a more efficient and effective approach to troubleshooting.

Monday, May 1, 2023

Deploy Windows LAPS [Step by step guide]

Standard

Microsoft Local Administrator Password Solution (LAPS) is a free solution that provides a secure way to manage local administrator passwords on Windows computers. LAPS works by randomly generating a complex password for the local administrator account on each computer and storing it securely in Active Directory/. The password is then periodically changed and updated, helping to prevent attackers from gaining access to the local administrator account and compromising the computer or network. LAPS is a simple and effective way to improve the security of local administrator accounts across an organization's network.

Windows LAPS is the newer solution  Microsoft has introduced to us. It's much easy to deploy and much easy to maintain the Administrative password.  Windows LAPS also adds many features that aren't available in legacy Microsoft LAPS. You can use Windows LAPS to back up passwords to Azure Active Directory, encrypt passwords in Windows Server Active Directory, and store your password history.

Windows LAPS doesn't required to install any agent on the PCs like legacy Microsoft LAPS. Old day we used MECM (SCCM), GPO or Any 3rd party application to Deploy the client. 

Windows LAPS Support Hybrid Azure AD  Join and Azure AD join but doesn't support the Azure AD registered.  

Same as Microsoft LAPS, Windows LAPS also freely available with Azure AD basic and above but you might be need to purchase Azure AD Premium plan 1 or plan 2 for conditional Access and Intune license for benefit the Windows LAPS other features.

Sunday, April 30, 2023

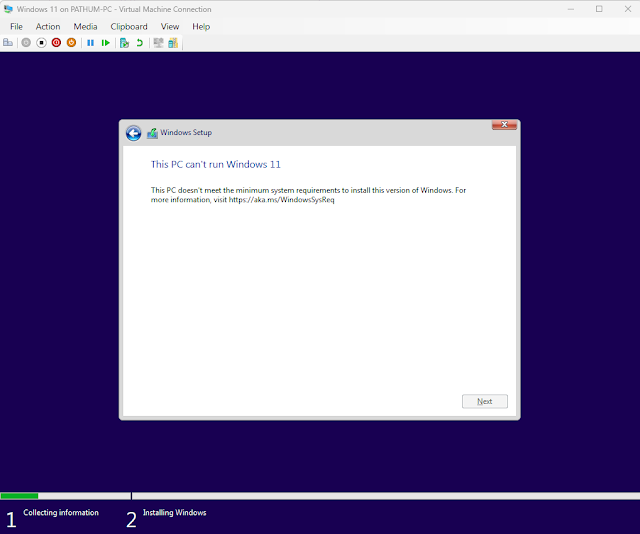
Hyper-V Windows 11 VM Creation Error - "This PC doesn't meet the minimum System requirements to install this version of windows.

Standard


When we create a VM on the Hyper-V, Windows 11 we getting these errror. these are the minimum system requirements you need to create the Windows 11 VM.

Blow things we need to check when we are creating the VM

  • VM Generations

We need to select Generation 2 because its the one support UEFI Secure boot.

  •  Processor

In the Settings we need to make sure that we have selected more than 2 virtual processers.

  • Enable Trusted Platform Module

Go to settings and select Security and mark "Enable Trusted Platform Module". Most of the time this might be the issue we getting about error. default its not enable the Trusted Platform Module.


Friday, April 28, 2023

MD-100 & MD-101 Exam will be Rename to Microsoft 365 Certified: Endpoint Administrator Associate (MD-102)

Standard

Microsoft has announced that it will be renaming its popular certification program for desktop administrators, the Microsoft 365 Certified: Modern Desktop Administrator Associate, to the Microsoft 365 Certified: Endpoint Administrator Associate. The new certification program will come into effect on July 1, 2023, and is aimed at addressing the evolving needs of modern workplaces, where endpoint management has become a critical aspect of IT administration.

The Microsoft 365 Certified: Endpoint Administrator Associate certification is designed to equip IT professionals with the skills and knowledge they need to manage and secure endpoints across a range of devices and platforms, including Windows, macOS, iOS, and Android. It will cover topics such as device management, application management, security, and compliance, among others.

To earn the new certification, IT professionals will need to pass the MD-102 exam, which will be available from May 2, 2023. The exam will test candidates on their ability to configure, manage, and secure endpoint devices and applications, as well as their knowledge of Microsoft 365 security and compliance solutions.

The renaming of the certification program reflects Microsoft's commitment to keeping pace with the changing technology landscape and ensuring that its certification programs remain relevant and up-to-date. By aligning its certification programs with the evolving needs of modern workplaces, Microsoft is helping to ensure that IT professionals have the skills and knowledge they need to succeed in their roles and contribute to the success of their organizations.


In conclusion, the renaming of the Microsoft 365 Certified: Modern Desktop Administrator Associate certification to the Microsoft 365 Certified: Endpoint Administrator Associate certification reflects the changing needs of modern workplaces and underscores Microsoft's commitment to providing IT professionals with the skills and knowledge they need to succeed in their roles. The MD-102 exam, which will be available from May 2, 2023, will test candidates on their ability to manage and secure endpoints across a range of devices and platforms, and is a crucial step for IT professionals looking to enhance their skills and advance their careers.

https://learn.microsoft.com/en-us/certifications/exams/md-102?wt.mc_id=certsustainedmkt_portfolioupdate_blog_wwl

A New Unified Domain for Microsoft 365 apps and services

Standard

Microsoft introduced the cloud.microsoft unified domain for Microsoft 365 apps and services!


Microsoft has always been known for its wide range of products and services, from the popular Windows operating system to its productivity suite, Microsoft Office. However, with the rapid growth of cloud computing and the increasing number of services and applications that Microsoft offers, it can be challenging for end-users to keep track of all the different domains and names associated with these products.

To address this fragmentation, Microsoft recently announced the introduction of a new unified domain for Microsoft 365 apps and services - cloud.microsoft. This move is aimed at providing users with a more consistent and cohesive experience across all Microsoft 365 services, regardless of the specific product or service they are using.

One of the key benefits of this unified domain is the ability to simplify authentication and sign-in processes for users. Previously, users may have had to navigate multiple domains and sign-in pages when accessing different Microsoft 365 apps and services. However, with the introduction of cloud.microsoft, users can sign in once and access all Microsoft 365 apps and services from a single, unified domain.

Furthermore, this move towards a unified domain is part of Microsoft's broader strategy of simplifying its product and service offerings. By consolidating its products and services under a single domain, Microsoft aims to provide a more seamless experience for users and increase overall efficiency across its product lines.

Overall, the introduction of cloud.microsoft is a positive step towards a more streamlined and cohesive experience for Microsoft 365 users. By reducing fragmentation and providing a unified domain for all Microsoft 365 apps and services, users can more easily access the tools they need to be productive, while IT administrators can more effectively manage and secure their organization's Microsoft 365 environment. As Microsoft continues to evolve and expand its product offerings, this move towards a more unified experience is sure to benefit both end-users and administrators alike.

More Details on  cloud.microsoft  - https://techcommunity.microsoft.com/t5/microsoft-365-blog/introducing-cloud-microsoft-a-unified-domain-for-microsoft-365/ba-p/3804961


Thursday, April 27, 2023

Which method suits you to deploy the bitlocker

Standard

 BitLocker is a built-in encryption feature of Microsoft Windows operating systems. Here are three steps you can deploy BitLocker:

  1. Enable by User
  2. GPO Deployment
  3. 3rd Party Application or Intune/MECM

Enable By User

User can enable the bitlocker by user following below steps
  1. Click on the "Start" button and select "Settings" (the gear icon).
  2. Click on "Update & Security".
  3. Click on "Device encryption" or "BitLocker".
  4. If your device doesn't support device encryption, you will see a message indicating that BitLocker isn't available for your device. Otherwise, you will see the BitLocker settings page.
  5. Click on "Turn on BitLocker".
  6. Select the drive you want to encrypt.
  7. Choose how you want to unlock the drive (password, smart card, etc.) and follow the on-screen instructions to set up the unlock method.
  8. Choose where you want to save your recovery key in case you forget your password or lose your unlock method.
  9. Click on "Encrypt" to start the encryption process.

Note: Depending on the size of the drive and the speed of your computer, the encryption process may take some time to complete.


Pros

  • Easy to enable
  • Do not need any vendor support to rollout
  • Settings can be select by user

Cons

  • Recovery key can be lost if not securely store. 
Note: its good to store on the Microsoft Account. here is the link to access the recovery key https://account.microsoft.com/devices/recoverykey


GPO Deployment

Enabling BitLocker by GPO (Group Policy Object) is a good way to ensure that all computers in your organization have BitLocker enabled and that they comply with your company's security policies. Here are the steps to enable BitLocker by GPO:

  1. Open the Group Policy Management Console (gpmc.msc) on a domain-joined computer.
  2. Expand the domain and select the Organizational Unit (OU) that contains the computers you want to enable BitLocker on.
  3. Right-click the OU and select "Create a GPO in this domain, and Link it here".
  4. Name the GPO and click "OK".
  5. Right-click the new GPO and select "Edit".
  6. Navigate to "Computer Configuration\Administrative Templates\Windows Components\BitLocker Drive Encryption".
  7. Double-click "Operating System Drives" to open the policy settings.
  8. Enable the "Require additional authentication at startup" policy and set it to "Enabled".
  9. Enable the "Choose how BitLocker-protected operating system drives can be recovered" policy and set it to "Enabled".
  10. Configure the remaining policies based on your organization's security policies.
  11. Click "OK" to save the changes.
  12. Close the Group Policy Management Editor window.

The next time the computers in the selected OU update their group policies, BitLocker will be enabled on the operating system drives, and the policies you configured will be applied.

There are Two method we can store the recovery key

  • Store in the Share file location
Navigate to "Computer Configuration\Administrative Templates\Windows Components\Choose Default Folder for Recovery Password"
  • Store in Active directory services
Computer Configuration > Administrative Templates > Windows Components > Bitlocker Drive Encryption and Change the “Store Bitlocker recovery information in Active Directory Domain Services” to enabled

Pros

  • Easy to rollout mass scale
  • automated
  • Key will be store in secure location

Cons

  • Reporting not available
Note, if we only use 3rd party or Intune/MECE will provide the Reporting features. 

Conclusion

In summary, there are three ways to deploy BitLocker encryption on your organization's devices: by enabling it by the user, by using GPO deployment, or by using a third-party application or Intune/MECM. Each method has its own advantages and disadvantages, and the best method for your organization will depend on your specific needs and security policies. By enabling BitLocker encryption on your organization's devices, you can help protect your sensitive data from unauthorized access and mitigate the risk of data breaches.

How to short Teams Meeting URL?

Standard

Sharing Teams URLs via email or social media can be a bit of a hassle. The lengthy URLs can take up a lot of space and may not fit properly on certain platforms. Fortunately, there is a solution to this problem: URL shortening. By shortening the URL, you can make it easier to share the link with others, without taking up too much space.

One of the easiest ways to shorten a Teams URL is to use the Microsoft Teams URL Shortener. This tool is designed specifically for Teams links and can be accessed at https://en.msteams.link/. All you need to do is copy and paste the long Teams URL into the input box, and the tool will generate a shorter, more manageable URL.

For example, let's take this Teams URL:

https://teams.microsoft.com/l/meetup-join/19%3ameeting_Y2UzMzhjZTMtNDljMi00MTg4LTg5ZjgtYmJhM2RhZGI0MDU5%40thread.v2/0?context=%7b%22Tid%22%3a%2248f5eb81-f396-4273-836d-10b63b081eb5%22%2c%22Oid%22%3a%22b8b4094c-ccc9-4100-9f37-24b2624dcccc%22%7d

This URL is quite long and may not fit properly on certain platforms. However, by using the Microsoft Teams URL Shortener, we can generate a shorter URL like this:


As you can see, the new URL is much shorter and easier to share with others. Additionally, the Microsoft Teams URL Shortener also provides a QR code, which can be scanned by others to quickly access the Teams link.

In conclusion, sharing Teams URLs via email or social media doesn't have to be a hassle. By using a URL shortener like the Microsoft Teams URL Shortener, you can generate shorter, more manageable URLs that are easier to share with others. So next time you need to share a Teams link, give it a try!


Wednesday, April 26, 2023

Windows LAPS management via Microsoft Intune available in preview

Standard

 Microsoft has recently announced the preview availability of Local Administrator Password Solution (LAPS) management via Microsoft Intune. This new feature enables IT administrators to manage LAPS settings for on-premises Windows devices from the cloud-based Intune console.

LAPS is a Microsoft solution that provides a random and unique password for the local administrator account on each Windows device, helping to enhance security by preventing the spread of credentials between devices. With this new Intune integration, administrators can now easily manage LAPS settings for on-premises Windows devices without the need for additional infrastructure or tools.

To get started with LAPS management via Intune, administrators need to enable the feature in their Intune tenant and configure the settings they want to use. They can then deploy the LAPS client to their on-premises Windows devices using Intune, and configure the LAPS settings as needed.

Once the LAPS client is deployed, Intune will automatically rotate the local administrator password according to the configured policy. The new password will be stored securely in Active Directory, where it can be retrieved if needed.

This new feature is particularly useful for organizations with a large number of on-premises Windows devices that want to improve their security posture without additional complexity. By leveraging Microsoft Intune for LAPS management, administrators can easily manage this critical security feature for their on-premises devices from a single, cloud-based console.

Overall, the availability of LAPS management via Microsoft Intune is a welcome addition to the already robust security management capabilities of the platform. As more organizations adopt cloud-based management solutions, this feature will provide an easier and more streamlined way to manage LAPS settings for on-premises Windows devices.


What can I do after O/L & A/L exam?

Standard

 After finishing your O/L or A/L, you might be wondering what's next for your education and career. One option to consider is becoming a Microsoft professional by following the Microsoft Learning path.

Microsoft offers several paths for individuals to become certified professionals in different areas, including Azure, Microsoft Office 365, Security, and Data & AI. Each path offers a range of exams and certifications that can help you gain valuable skills and knowledge in your chosen field.

Azure is a cloud computing platform that offers a variety of services such as virtual machines, databases, and analytics. If you're interested in becoming an Azure professional, you can start by taking the Azure Fundamentals exam, which covers basic cloud concepts and services. From there, you can explore more advanced topics and certifications such as Azure Administrator, Azure Developer, and Azure Solutions Architect.

Microsoft Office 365 is a cloud-based suite of productivity tools such as Word, Excel, and PowerPoint. If you're interested in becoming an expert in Office 365, you can start by taking the Microsoft 365 Fundamentals exam, which covers basic concepts of the platform. From there, you can explore more advanced topics and certifications such as Microsoft 365 Enterprise Administrator, Microsoft 365 Developer, and Microsoft 365 Security Administrator.

Security is a critical aspect of any technology system, and Microsoft offers several certifications to help professionals develop expertise in this area. You can start by taking the Security Fundamentals exam, which covers basic security concepts and principles. From there, you can explore more advanced topics and certifications such as Security Administrator, Security Engineer, and Information Protection Administrator.

Data & AI is another area where Microsoft offers certifications for professionals. If you're interested in becoming an expert in data and AI, you can start by taking the Data Fundamentals exam, which covers basic concepts of data and databases. From there, you can explore more advanced topics and certifications such as Data Analyst, Data Scientist, and AI Engineer.

In conclusion, becoming a Microsoft professional is a great way to develop valuable skills and knowledge in different areas of technology. By following the Microsoft Learning path and taking the foundation exams, you can start building your expertise and working towards a certification that can open up many career opportunities. So, if you've just finished your O/L or A/L, consider exploring the Microsoft Learning path and taking the first step towards becoming a certified professional.

Practice Assessments for Microsoft Certifications

  1. AI-900: Microsoft Azure AI Fundamentals
  2. AZ-104: Microsoft Azure Administrator
  3. AZ-204: Developing Solutions for Microsoft Azure
  4. AZ-305: Designing Microsoft Azure Infrastructure Solutions
  5. AZ-400: Designing and Implementing Microsoft DevOps Solutions
  6. AZ-500: Microsoft Azure Security Technologies
  7. AZ-900: Microsoft Azure Fundamentals
  8. DP-203: Data Engineering on Microsoft Azure
  9. DP-900: Microsoft Azure Data Fundamentals
  10. MB-910: Microsoft Dynamics 365 Fundamentals (CRM)
  11. MB-920: Microsoft Dynamics 365 Fundamentals (ERP)
  12. MS-700: Managing Microsoft Teams
  13. MS-900: Microsoft 365 Fundamentals
  14. PL-300: Microsoft Power BI Data Analyst
  15. PL-900: Microsoft Power Platform Fundamentals
  16. SC-900: Microsoft Security, Compliance, and Identity Fundamentals

Join on our next session and learn more 

Event Link: https://fb.me/e/8XFJKRX01

Monday, November 2, 2015

How to Change or Edit the Microsoft email address (@live.com, @hotmail.com, @outlook.com)

Standard
1: Add a new alias.
  1. Sign in to your Microsoft account.
  2. Select Your Info.
  3. Select Manage your sign-in email or phone number.
  4. Because of the sensitive nature of changing your alias, you'll be prompted to enter the code that we send to the email or phone number you listed in your account as security information. This lets us know the request is coming from you.
  5. Select Add email alias.
    • If you don't already have an email address, select Create a new email address and add it as an alias. Follow the instructions.


 2.Set the new email address as the primary alias.
After you set the new email address as your primary alias, that email address will be displayed as your Microsoft account alias when you sign in to all devices and services. Here's how to make this change:
  1. Under Account alias, select aliases.
  2. Click or tap Make primary under the alias that you want as primary.

3: Remove the old email address you no longer want to use.
Select Remove next to the alias you want to remove. Follow the instructions provided.

Note It can take up to 48 hours for the change to your email address to be implemented on all Microsoft services. 
You can use any email address or phone number you have listed as an alias to sign in. To make it harder for someone to break in to your account, change your sign-in preferences to turn off any alias you don't want used to sign in.